By: ViciousXUSMC from Notebookreview.com
Here is my newest guide project. This time its not how to hack bios files or edit .inf's but something a bit more common in need. Knowing how to convert a file type to another type or encode a video/audio file.
This subject is as vast as the blue sea, with so many codecs, file types, and free programs out there, I am going to try to weed through them and give you a streamline and user friendly way to do it with (free) programs I trust and try to teach you some stuff along the way.
At time of publishing this guide will only be small, but as I get request for new material and find time on my hands I will add new segments to it as I go to make it an ultimate comprehensive guide to do it all.
_____________________________________________________
Resources
Media Players
Winamp - My personal favorite audio player, very well supported and anything it cant play it definitly has a plugin for. A alternative is Foobar2000 but I never took the time to get to know foobar and the easy to find plugins for winamp and easy to use setup won me over.
Media Player Classic - My personal favorite video player, just works right. Fast to open, good interface, and all the options I need. I never actually install this program on its own, it comes included with my codec pack CCCP
VLC Player - I use this as my backup to MPC above, if there is a very rare file type that MPC wont support because it was not done properly (like some odd subtitles format) I found VLC is the one player that can probably make it work.
CCCP (combined community codec package) - A codec pack that will install all the things you need to play different video formats and support the different kinds of subtitles. It includes Media Player Classic in its install. An alternative often used for CCCP is K-Lite but I prefer CCCP. Some will argue that codec packs are bad but I have never had a problem and this one made life easy for me.
Encoders/Decoders/GUI/Frontends
Nero AAC - Hands down the best AAC encoder out there, and Nero is nice enough to give it to you for free! the EULA says it can only be used for personal use so thats why no program I know of other than Nero comes with this pre-installed. Its an .exe that runs via command line but there are many frontends out there with a gui that will automate it for you.
FLAC (Free Lossless Audio Codec) - A well known open source codec to compress music but still retian all of the original quality. So file size is smaller than a standard non compressed .WAV but still the same quality. Just like Nero AAC, its just a .exe that runs via command line but FLAC now comes with its own GUI frontend to make using it simple for beginners.
MeGUI - Another open source program. Overall the best GUI for encoding I can think of. Lots and lots of support behind this program, easy to use but still gives most of the advanced options that command line users are capable of using. It self updates and self downloads all the files needed to work so its super streamline. Does muxing, demuxing, audio encoding, video encoding, and supports every major codec. Also has many preconfigured profiles for you to choose from for encoding, just pick "Iphone" for instance to get perfect settings to encode video/audio for you Iphone.
AviSynth - A very special tool used in many/most of the modern open source video encoders. Its a post production scripted tool. You basically create a file that tells this program what to "send' to your encoder. Hard to explain butt a needed tool. The friendlier GUI's will automate most of this stuff for you. A good example of what it does is what I use it for often my FRAPS clips, they record in like 2 minute long chunks. I write a AviSyth file that says "add all of these smaller files together as one, and resize it to this size" so when I open the AviSynth file the video player or encoder see's all the files as one and in the new size rather than me having to put them together in an editor and render them. Its your middle man for video encoding and sometimes audio stuff too.
StaxRip - Another open source encoder/transcoder similar to MeGui, doesn't seem to update to the latest codecs quite as fast (mostly x264) and doesn't has as many advanced options but still has a few noticeabe features that make it a good alternative to MeGUI and you should try it out to see if you like it better
Avidemux - The third encoding gui of my trio, this one was uniqe in it has a built in editor of sorts so its the only one that can automate cutting clips and stuff for you without the need for a video editor. All 3 of the trio support H264 via x264 and AAC and thats the most important thing.
NeroAAC UI - I just found this today 12/16/09 while looking for a way to carry over the ID tags from a FLAC to a AAC file, this program can do it (for English character only) also does the encoding/decoding and can work directly from flack --> aac. Really nice little UI program.
Rippers
EAC (Exact Audio Copy) - Pretty tried and true this is probably the best CD audio ripper out there. It can nativity rip to FLAC or WAV, MP3, and it uses the free online database to automate inserting all your ID tags.
CDex - The main alternative to EAC, some like it better some dont, has most of the same options.
DVDFab - This is the best DVD ripper out there, its fast, accurate, seems to get around all protections and lets you do just certian chapters, or audio tracks to save space & time. This is the only program so far that is not free or open source but I have not found any replacement for it. Everything I needed to do with it the free version can do I think.
Tag Editors
Mp3Tag - A good tag editor with database lookup functions
TagScanner - A good alternative to Mp3Tag
___________________________________________
My encoding goals
I will teach you how to encode to any format you wish, however its my personal recommendation and goal when encoding to always shoot for H264 (x264) as the video codec and AAC for the audio codec. Simply put these are the best two lossy codecs out there and they are widely supported.
Your im sure very familiar with MP3 and probably XVID/DIVX.
AAC is pretty much the new improved version of MP3 its about 1.5-2x better. Meaning simply you can get the same quality file in 1/2 the size or 2x the quality out of a file the same size as a MP3. AAC is the standard for Itunes and Sony PS3, almost any modern device supports it and of course any computer can play it.
AAC is usually in a .MP4 or .M4A file, rarely you may see one in its raw .AAC format. .M4A is what Itunes uses to read the ID tag data and the container I always use so I do not get it confused with my .MP4 video files.
H264 is almost exactly the same kind of upgrade to XVID/DIVX, its anywhere from 1.5-3x better, offering a lot of new features and coming out with new ones almost daily. It has much much higher quality in low bitrate settings than the older codecs can produce. Most modern devices support it and any computer supports it. Devices may not support all the most advanced features of it so you have to make sure not to include them. GUI's like MeGUI have profiles preset for you with your device so you do not accidentally use a feature your device does not support. It takes a bit more CPU power to play a H264 file than it would DIVX or XVID but its very worth it in both quality and file size. These files are usually in a .MP4 file or .MKV file.
I personally use .MKV now but used to use .MP4, my Sony phone for example will only play the .MP4 files so sometimes you do not have a choice.
FLAC --> AAC (or MP3 if you really want)
Ok! first part of the guide. I have had forum members ask me how to convert there FLAC files into MP3.
Easy, here is how but keep in mind I will show you how to use AAC  if you use MP3 instead thats up to you.
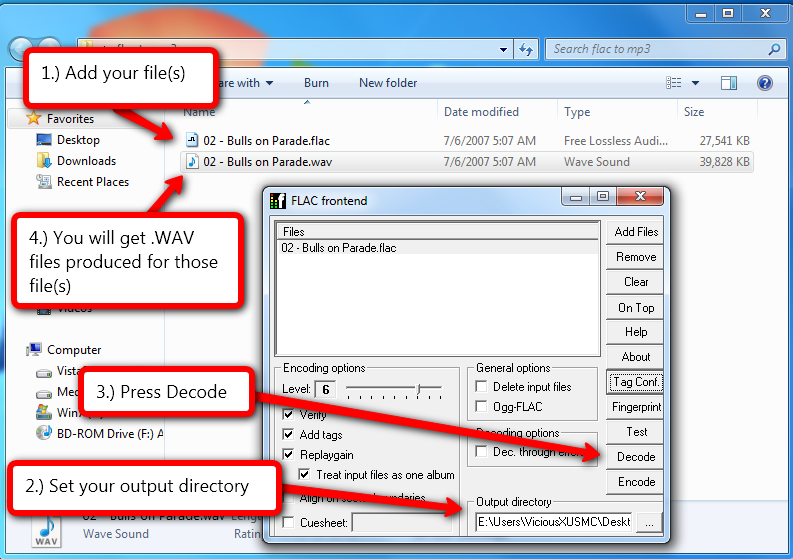
1.) Download the FLAC frontend linked on the first post install it and open it. (1.1.4b currently is the newest version)
2.) Add the file(s) you want into the front end with the add files button or drag & drop works
3.) Make sure to set your output directory to a folder you want
4.) Hit the Decode Button
This will produce a .WAV file for your songs.
Flac is a lossless compression of WAV files basically, so the first thing we had to do was change it back into a .WAV file
From here your ready to encode it back into a .MP3 with the MP3 encoder of your choice or follow my steps to make a AAC file.
It would be easy and fast to just download the Nero AAC files linked above in the first post and give you a command line code to run it, but we will use frontends for this to make it easy for you.
The frontend I will use to encode this .WAV file to AAC is MeGUI so you need to download BOTH MeGUI & the NeroAAC files linked in the first post.
Install MeGUI and it will ask you to update do all the updates it asks you for and when it asks you to import the presets import everything even if you think you wont use it.
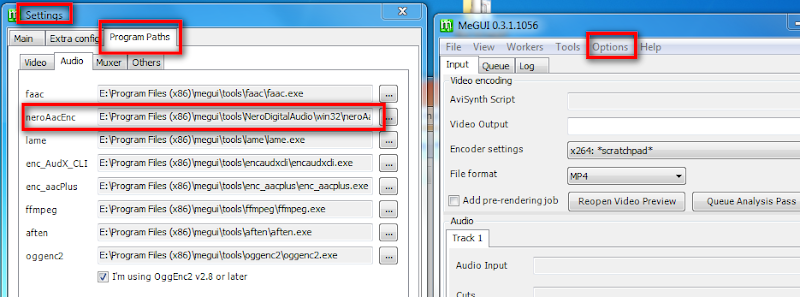
Now here is a part somebody will miss without guidance, remember I told you Nero AAC has that EULA that says basically a program can not include it, so MeGUI supports it but does not include it and its the only codec that it wont automatically download for you. So after you have MeGUI installed, updated, and setup you need to manually add Nero AAC to its list of programs.
So Unzip the neroaac download and put it somewhere you like, I coped the folder into the MeGUI programs folder.
In MeGUI go to Options --> Settings --> Program Paths --> Audio and set and save the path to your NeroAACEnc.exe
Now we are all setup and ready to roll with encoding.
1.) Just add your file in the audio input secton
2.) Select one of the Nero AAC presets I used the Ipod high preset witch is LC 196kb/s Stereo, equal to or better than a 320kb/s MP3
3.) Select your file container MP4 or M4A, I recommend M4A, Ipods need this and its easier to tell them apart from MP4 video files (M4A is MP4 Audio)
4.) Click on the Enqueue button
5.) Once you have queued up all the files you want to encode go over to the que tab near the top of MeGUI and hit Start
6.) The files will encode and produce nice AAC encoded M4A files for you in the same directory as the input file (unless you changed the output directory in the queue step)
Just for the sake of comparison I did another encode 320kb/s Lame MP3 the standard Mp3 codec used and here is what my folder looked like after this tutorial:
Original lossless Compress FLAC File - 27.5MB
Uncompressed lossless WAV File - 39.8MB
320 kb/s high quality lossy mp3 - 9MB
192kb/s high quality lossy AAC - 5.4MB
I got the same quality as the MP3 in 1/2 the size just like I said it would

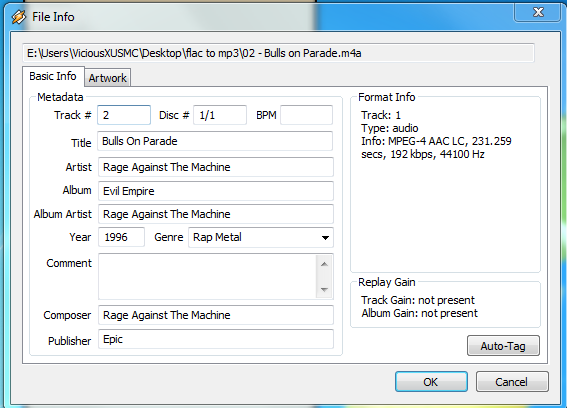
I know the music guys main concern right now is converting these and retaining the tags. I have a few methods in the works and that will be the next posting in the guide. However for now you can use one of the two tagging programs linked in the first post, or I had great success with Winamp!
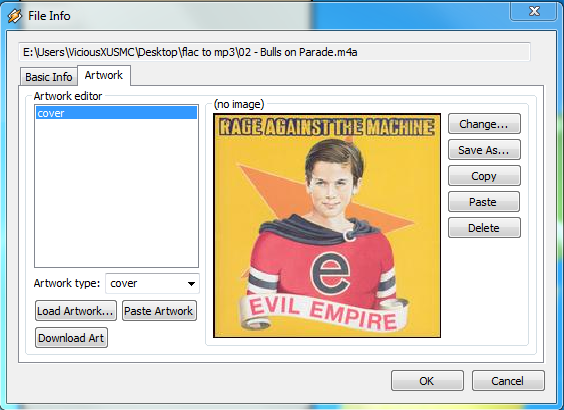
I just played these song and right clicked on file info and told it to find the tags and cover art and it found both within seconds.
Not sure what database winamp uses, but it seems to work really well.
If you feel MeGUI is super overkill for this conversion (and it is) you can try this tool:
http://forum.doom9.org/showthread.php?t=110970Its a very simple gui that just automates the basics of NeroAACEnc.exe use the LC setting for Ipod (low complexity) and set the bitrate to what you want.
I taught how to use MeGUI since it has the profiles built in and I like to have it around for video encoding anyways.
neroaacenc.exe can only encode .wav files nativity but programs like MeGUI will transcode simple formats like mp3 for you so you dont have to do the conversion. .FLAC is one of the formats it doesn't seem to do for you so I had to teach you how.
Update 12/16/09 on Flac --> AACDont want to catch a fish and would rather have somebody catch it for you??? I have just the thing! I found a nice little GUI that combinds the above process for you that is made specially to decode a flac file into a wav, and then encode the wav to a AAC and even carry over the ID tag information all in one step. Use Nero AAC UI -
http://www.digitalradiotech.co.uk/nero_aac_ui.htmIt will produce the exact same results except while it can/will carry over ID tag information the tag info was not as complete for me as it was when I used Winamp to look it up from the database. Next using the same kind of process as this UI I am going to teach you how to rip directly from CD --> AAC and carry over tag info all in one program - EAC (Exact Audio Copy)
______________________________________
Extracting (Ripping) CD's directly to AAC With Tags(or FLAC & Mp3)
Ok, if you have CD's and you want to extract your music onto your computer for listening/backup or so you can play it on another device AAC is a good way to go.
Setup:
You will need to download 2 of the tools from the first post to do this if you do not already have them: EAC (Exact Audio Copy), and Nero AAC
1.) Install EAC and get the program up and running, make sure you uncheck the ebay icon link when you install it its bloatware included since this is freeware.
2.) Configure EAC the way you like, fast ripping or accurate ripping it will walk you thorough this, also make sure to put in your email address so you can use the free tag database function.
If you want to rip and encode to FLAC or MP3 the program can do it for you as it comes, it includes those features. Follow the rest of the steps to manually setup the program to use Nero AAC.
3.) Time to setup our files we need, go into your
C: and make a folder named
NeroRip and put inside the 3 Nero files that you downloaded.
4.) Ok the fun part, open EAC and go into the
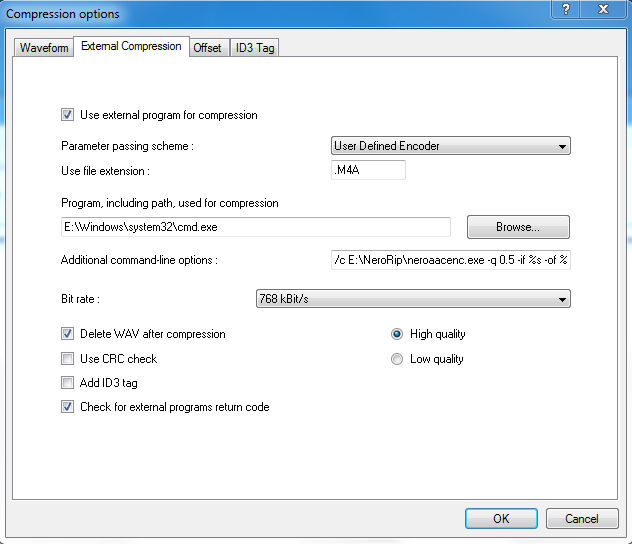
Compression Options set it up just like this:
In order from top to bottom
> check box for "use external program"
> parameter passing scheme is "user defined encoder"
> use file extension - type .M4A
> program including path is
C:\Windows\system32\cmd.exe (Important my image says E: because I am dual boot and my win7 boot uses the E: for you your probably on C

> additional command line options -
/c C:\NeroRip\neroaacenc.exe -q 0.5 -lc -if %s -of %d && C:\NeroRip\neroaactag.exe %d -:artist="%a" -:album="%g" -:track="%n" -:title="%t" -:genre="%m" -:year="%y"> uncheck add ID3 Tag
> delete wav is your preference
Now your ready to roll but before you go rip any songs you may want to change the encoding settings to your preference. You are basically running neroaacenc.exe from the command line now so you have to manually change the setting in the additional command line string if you have a different preference.
The part to change is -q 0.5 what that tells the encoder to do is make a VBR (variable bit rate) of .5 quality (very high quality) this is probably good for 99% of you as is, but if you want a different quality file or do not want to use VBR change the setting.
Quick and Dirty Settings Guide
VBR (variable bit rate)is the best it uses the tag -q and has a range from 0.00 to 1.00, the .5 setting I used is very high quality, most people use about .35 for high quality. (-q .5)
CBR (constant bit rate) is the worst to use and not recommended it uses the tag -cbr and uses the value of the bit rate you want like 192000 would give you 192kb/s file. (-cbr 192000)
ABR (average bit rate) is in the middle in quality and uses the tag -br and uses the value of the bit rate you want like 128000 would give you a 128kb/s file. (-br 128000)
Setup is complete time to use it!
1.) Put your CD in your drive
2.) Go to Database --> Get CD Information From --> Remote FreeDB, this will tag all your songs for you and name them
3.) Press Control + A to Select All Track (or pick just the tracks you want)
4.) Right Click and Select Copy Selected Tracks --> Compressed
5.) The save dialog will come up and let you choose a location, the save name will say "ignore file name" thats what you want it will name the file for you based on the tag information.
6.) Wait it can take a while if you used the accurate rip method, but when its done you will have a AAC encoded .M4A file with all of the tag information inside, once the setup part is complete this makes ripping many CD's very fast and easy and saves you all the work of first ripping and then encoding or adding tags after the AAC encoding.
