Tuesday, May 24, 2011

The Table of Contents **UPDATED 05/24/11**

Please Note: Not all of the information on this site is thought up by me. I have compiled it from knowledge I know, bits and pieces from many different sites on the internet, articles I have read in magazines and newspapers, and other information I have heard about from other people and have found out to be accurate. I have also added my own opinions which are considered useful by many people.

Here is the Table of Contents of my FAQ. Hope this helps everyone!
Also, don't forget to leave comments at the bottom of my posts!


**UPDATED: 5/24/11**

54. ViciousXUSMC's Ultimate Encoding Guide

1. Company Overviews
2. Everything You Need To Know About Processors
3. Intel Pentium-M processor speeds
4. Dual-Core, 64-bit, and Hyperthreading
5. 64-Bit and Dual Core Mobile Processors Guide
6. Microsoft Windows XP Editions and Costs
7. Microsoft Windows Vista Editions and Costs
8. Windows Vista Capable and Premium Ready PCs
9. Graphics Card Comparison Chart
10. All about GPUs (A.K.A. Graphics Processing Unit)
11. The Simplified Wireless Networking Guide
12. In Depth Wireless Internet and Network Guide
13. Wireless Router Guide
14. Desktop PC, Notebook PC, or Tablet PC?
15. What To Upgrade On My Computer
16. Notebook Memory (RAM) Guide
17. Notebook Screen Guide
18. Do-It-Yourself: Making An External Hard Drive Guide
19. LCD Resolutions and Ratios (Part 1)
20. Boot Camp or Parallels Guide to Running Windows on an Apple MacIntel
21. Windows XP Installation Guide
22. Windows Vista: The Best Case for Windows XP Ever
23. LCD Resolutions and Ratios (Part 2)
24. Notebook and PC Partitioning Guide
25. How To Clean Your PC
26. Disable Hybrid Sleep Mode in Windows Vista (a.k.a. Fix Sleep Mode in Windows Vista)
27. Best Anti-Viruses and Spyware Protection
28. Where's All My Disk Space Going? (Vista)
29. Do-It-Yourself: Solid State Disk (SSD) Guide
30. Virus Information Guide
31. A few XP Registry Settings that help improve battery life. (for notebook)
32. How It Works: Your Guide to Notebook Technology
33. Notebook Travel Guide
34. Guide to New Laptop Inspection...and Beyond!
35. Computer Optimization Guide
36. Guide to Polishing Your Scratched Glossy Notebook
37. How To Stream Video From Your Laptop To Your TV
38. How it Works: Graphics Hardware
39. How It Works: Hard Disks
40. DIY Notebook Screen Replacement
41. How It Works: Screens
42. How It Works: Batteries
43. How It Works: Optical Drives
44. Guide: How to Delete Hidden Recovery Partition on Vista
45. Clean Install Guide (works for 32-bit or 64-bi
46. Netbook Buyers Guide
47. NotebookReview.com Guide To Buying A Notebook Online
48. Gamers Graphics Tuning Guide
49. Windows Vista Backup & Restore Center Review
50. Windows PC Optimization Guide Part 1
51. Windows PC Optimization Guide Part 2
52. Windows PC Optimization Guide Part 3
53. Internet Safety Guide: How to Protect Yourself Online
54. ViciousXUSMC's Ultimate Encoding Guide
Some FAQ's

54. ViciousXUSMC's Ultimate Encoding Guide

By: ViciousXUSMC from Notebookreview.com


Here is my newest guide project. This time its not how to hack bios files or edit .inf's but something a bit more common in need. Knowing how to convert a file type to another type or encode a video/audio file.

This subject is as vast as the blue sea, with so many codecs, file types, and free programs out there, I am going to try to weed through them and give you a streamline and user friendly way to do it with (free) programs I trust and try to teach you some stuff along the way.

At time of publishing this guide will only be small, but as I get request for new material and find time on my hands I will add new segments to it as I go to make it an ultimate comprehensive guide to do it all.

_____________________________________________________
Resources

Media Players

Winamp - My personal favorite audio player, very well supported and anything it cant play it definitly has a plugin for. A alternative is Foobar2000 but I never took the time to get to know foobar and the easy to find plugins for winamp and easy to use setup won me over.

Media Player Classic - My personal favorite video player, just works right. Fast to open, good interface, and all the options I need. I never actually install this program on its own, it comes included with my codec pack CCCP

VLC Player - I use this as my backup to MPC above, if there is a very rare file type that MPC wont support because it was not done properly (like some odd subtitles format) I found VLC is the one player that can probably make it work.

CCCP (combined community codec package) - A codec pack that will install all the things you need to play different video formats and support the different kinds of subtitles. It includes Media Player Classic in its install. An alternative often used for CCCP is K-Lite but I prefer CCCP. Some will argue that codec packs are bad but I have never had a problem and this one made life easy for me.

Encoders/Decoders/GUI/Frontends

Nero AAC - Hands down the best AAC encoder out there, and Nero is nice enough to give it to you for free! the EULA says it can only be used for personal use so thats why no program I know of other than Nero comes with this pre-installed. Its an .exe that runs via command line but there are many frontends out there with a gui that will automate it for you.

FLAC (Free Lossless Audio Codec) - A well known open source codec to compress music but still retian all of the original quality. So file size is smaller than a standard non compressed .WAV but still the same quality. Just like Nero AAC, its just a .exe that runs via command line but FLAC now comes with its own GUI frontend to make using it simple for beginners.

MeGUI - Another open source program. Overall the best GUI for encoding I can think of. Lots and lots of support behind this program, easy to use but still gives most of the advanced options that command line users are capable of using. It self updates and self downloads all the files needed to work so its super streamline. Does muxing, demuxing, audio encoding, video encoding, and supports every major codec. Also has many preconfigured profiles for you to choose from for encoding, just pick "Iphone" for instance to get perfect settings to encode video/audio for you Iphone.

AviSynth - A very special tool used in many/most of the modern open source video encoders. Its a post production scripted tool. You basically create a file that tells this program what to "send' to your encoder. Hard to explain butt a needed tool. The friendlier GUI's will automate most of this stuff for you. A good example of what it does is what I use it for often my FRAPS clips, they record in like 2 minute long chunks. I write a AviSyth file that says "add all of these smaller files together as one, and resize it to this size" so when I open the AviSynth file the video player or encoder see's all the files as one and in the new size rather than me having to put them together in an editor and render them. Its your middle man for video encoding and sometimes audio stuff too.

StaxRip - Another open source encoder/transcoder similar to MeGui, doesn't seem to update to the latest codecs quite as fast (mostly x264) and doesn't has as many advanced options but still has a few noticeabe features that make it a good alternative to MeGUI and you should try it out to see if you like it better

Avidemux - The third encoding gui of my trio, this one was uniqe in it has a built in editor of sorts so its the only one that can automate cutting clips and stuff for you without the need for a video editor. All 3 of the trio support H264 via x264 and AAC and thats the most important thing.

NeroAAC UI - I just found this today 12/16/09 while looking for a way to carry over the ID tags from a FLAC to a AAC file, this program can do it (for English character only) also does the encoding/decoding and can work directly from flack --> aac. Really nice little UI program.

Rippers

EAC (Exact Audio Copy) - Pretty tried and true this is probably the best CD audio ripper out there. It can nativity rip to FLAC or WAV, MP3, and it uses the free online database to automate inserting all your ID tags.

CDex - The main alternative to EAC, some like it better some dont, has most of the same options.

DVDFab - This is the best DVD ripper out there, its fast, accurate, seems to get around all protections and lets you do just certian chapters, or audio tracks to save space & time. This is the only program so far that is not free or open source but I have not found any replacement for it. Everything I needed to do with it the free version can do I think.

Tag Editors

Mp3Tag - A good tag editor with database lookup functions

TagScanner - A good alternative to Mp3Tag

___________________________________________

My encoding goals

I will teach you how to encode to any format you wish, however its my personal recommendation and goal when encoding to always shoot for H264 (x264) as the video codec and AAC for the audio codec. Simply put these are the best two lossy codecs out there and they are widely supported.

Your im sure very familiar with MP3 and probably XVID/DIVX.

AAC is pretty much the new improved version of MP3 its about 1.5-2x better. Meaning simply you can get the same quality file in 1/2 the size or 2x the quality out of a file the same size as a MP3. AAC is the standard for Itunes and Sony PS3, almost any modern device supports it and of course any computer can play it.

AAC is usually in a .MP4 or .M4A file, rarely you may see one in its raw .AAC format. .M4A is what Itunes uses to read the ID tag data and the container I always use so I do not get it confused with my .MP4 video files.

H264 is almost exactly the same kind of upgrade to XVID/DIVX, its anywhere from 1.5-3x better, offering a lot of new features and coming out with new ones almost daily. It has much much higher quality in low bitrate settings than the older codecs can produce. Most modern devices support it and any computer supports it. Devices may not support all the most advanced features of it so you have to make sure not to include them. GUI's like MeGUI have profiles preset for you with your device so you do not accidentally use a feature your device does not support. It takes a bit more CPU power to play a H264 file than it would DIVX or XVID but its very worth it in both quality and file size. These files are usually in a .MP4 file or .MKV file.

I personally use .MKV now but used to use .MP4, my Sony phone for example will only play the .MP4 files so sometimes you do not have a choice.

FLAC --> AAC (or MP3 if you really want)

Ok! first part of the guide. I have had forum members ask me how to convert there FLAC files into MP3.

Easy, here is how but keep in mind I will show you how to use AAC if you use MP3 instead thats up to you.

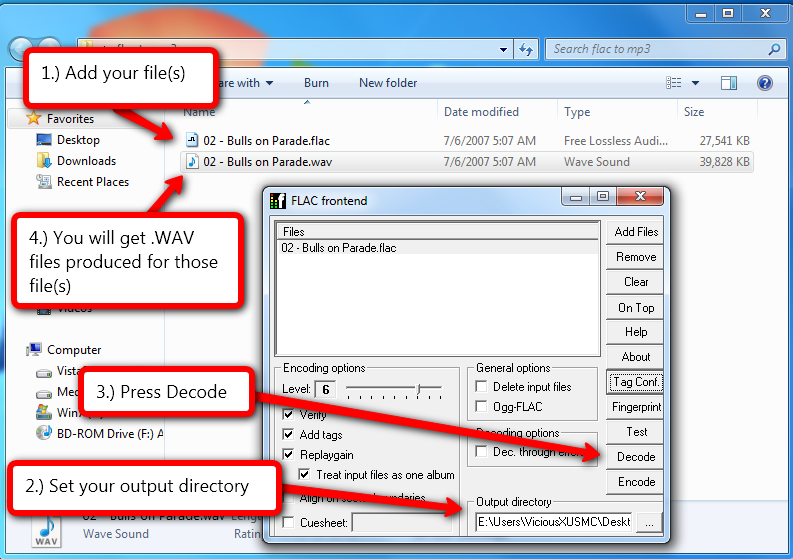
1.) Download the FLAC frontend linked on the first post install it and open it. (1.1.4b currently is the newest version)
2.) Add the file(s) you want into the front end with the add files button or drag & drop works
3.) Make sure to set your output directory to a folder you want
4.) Hit the Decode Button

This will produce a .WAV file for your songs.

From Encoding Guide


Flac is a lossless compression of WAV files basically, so the first thing we had to do was change it back into a .WAV file

From here your ready to encode it back into a .MP3 with the MP3 encoder of your choice or follow my steps to make a AAC file.
It would be easy and fast to just download the Nero AAC files linked above in the first post and give you a command line code to run it, but we will use frontends for this to make it easy for you.

The frontend I will use to encode this .WAV file to AAC is MeGUI so you need to download BOTH MeGUI & the NeroAAC files linked in the first post.

Install MeGUI and it will ask you to update do all the updates it asks you for and when it asks you to import the presets import everything even if you think you wont use it.

Now here is a part somebody will miss without guidance, remember I told you Nero AAC has that EULA that says basically a program can not include it, so MeGUI supports it but does not include it and its the only codec that it wont automatically download for you. So after you have MeGUI installed, updated, and setup you need to manually add Nero AAC to its list of programs.

So Unzip the neroaac download and put it somewhere you like, I coped the folder into the MeGUI programs folder.

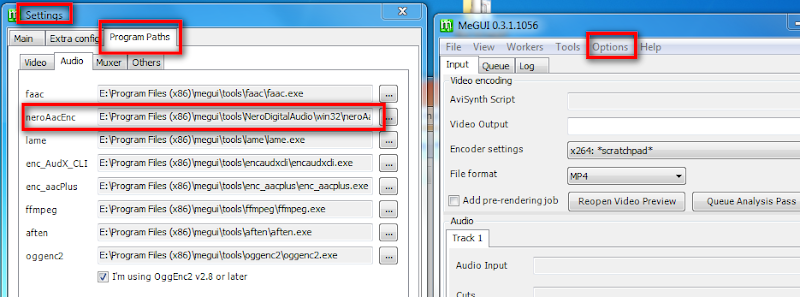
In MeGUI go to Options --> Settings --> Program Paths --> Audio and set and save the path to your NeroAACEnc.exe

From Encoding Guide


Now we are all setup and ready to roll with encoding.

1.) Just add your file in the audio input secton
2.) Select one of the Nero AAC presets I used the Ipod high preset witch is LC 196kb/s Stereo, equal to or better than a 320kb/s MP3
3.) Select your file container MP4 or M4A, I recommend M4A, Ipods need this and its easier to tell them apart from MP4 video files (M4A is MP4 Audio)
4.) Click on the Enqueue button

From Encoding Guide


5.) Once you have queued up all the files you want to encode go over to the que tab near the top of MeGUI and hit Start
6.) The files will encode and produce nice AAC encoded M4A files for you in the same directory as the input file (unless you changed the output directory in the queue step)

Just for the sake of comparison I did another encode 320kb/s Lame MP3 the standard Mp3 codec used and here is what my folder looked like after this tutorial:

From Encoding Guide


Original lossless Compress FLAC File - 27.5MB
Uncompressed lossless WAV File - 39.8MB
320 kb/s high quality lossy mp3 - 9MB
192kb/s high quality lossy AAC - 5.4MB

I got the same quality as the MP3 in 1/2 the size just like I said it would

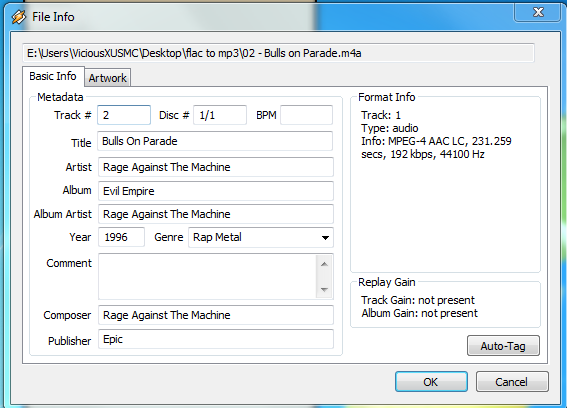
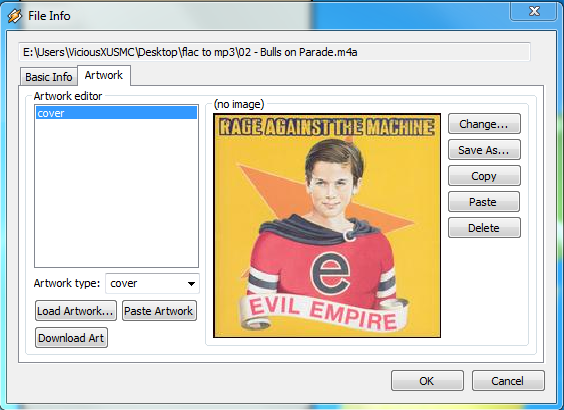
I know the music guys main concern right now is converting these and retaining the tags. I have a few methods in the works and that will be the next posting in the guide. However for now you can use one of the two tagging programs linked in the first post, or I had great success with Winamp!

I just played these song and right clicked on file info and told it to find the tags and cover art and it found both within seconds.

From Encoding Guide


From Encoding Guide


Not sure what database winamp uses, but it seems to work really well.

If you feel MeGUI is super overkill for this conversion (and it is) you can try this tool: http://forum.doom9.org/showthread.php?t=110970

Its a very simple gui that just automates the basics of NeroAACEnc.exe use the LC setting for Ipod (low complexity) and set the bitrate to what you want.

I taught how to use MeGUI since it has the profiles built in and I like to have it around for video encoding anyways.

neroaacenc.exe can only encode .wav files nativity but programs like MeGUI will transcode simple formats like mp3 for you so you dont have to do the conversion. .FLAC is one of the formats it doesn't seem to do for you so I had to teach you how.

Update 12/16/09 on Flac --> AAC

Dont want to catch a fish and would rather have somebody catch it for you??? I have just the thing! I found a nice little GUI that combinds the above process for you that is made specially to decode a flac file into a wav, and then encode the wav to a AAC and even carry over the ID tag information all in one step. Use Nero AAC UI - http://www.digitalradiotech.co.uk/nero_aac_ui.htm

It will produce the exact same results except while it can/will carry over ID tag information the tag info was not as complete for me as it was when I used Winamp to look it up from the database. Next using the same kind of process as this UI I am going to teach you how to rip directly from CD --> AAC and carry over tag info all in one program - EAC (Exact Audio Copy)

______________________________________

Extracting (Ripping) CD's directly to AAC With Tags
(or FLAC & Mp3)

Ok, if you have CD's and you want to extract your music onto your computer for listening/backup or so you can play it on another device AAC is a good way to go.

Setup:
You will need to download 2 of the tools from the first post to do this if you do not already have them: EAC (Exact Audio Copy), and Nero AAC

1.) Install EAC and get the program up and running, make sure you uncheck the ebay icon link when you install it its bloatware included since this is freeware.
2.) Configure EAC the way you like, fast ripping or accurate ripping it will walk you thorough this, also make sure to put in your email address so you can use the free tag database function.

If you want to rip and encode to FLAC or MP3 the program can do it for you as it comes, it includes those features. Follow the rest of the steps to manually setup the program to use Nero AAC.


3.) Time to setup our files we need, go into your C: and make a folder named NeroRip and put inside the 3 Nero files that you downloaded.
From Encoding Guide

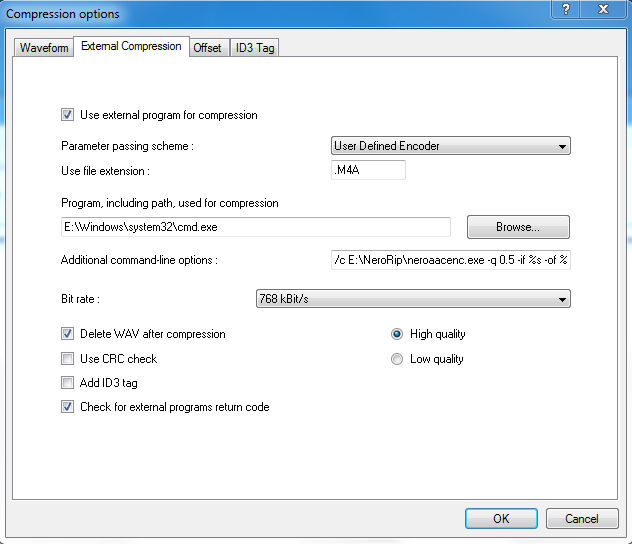
4.) Ok the fun part, open EAC and go into the Compression Options set it up just like this:

In order from top to bottom
> check box for "use external program"
> parameter passing scheme is "user defined encoder"
> use file extension - type .M4A
> program including path is C:\Windows\system32\cmd.exe (Important my image says E: because I am dual boot and my win7 boot uses the E: for you your probably on C
> additional command line options - /c C:\NeroRip\neroaacenc.exe -q 0.5 -lc -if %s -of %d && C:\NeroRip\neroaactag.exe %d -:artist="%a" -:album="%g" -:track="%n" -:title="%t" -:genre="%m" -:year="%y"
> uncheck add ID3 Tag
> delete wav is your preference

From Encoding Guide


Now your ready to roll but before you go rip any songs you may want to change the encoding settings to your preference. You are basically running neroaacenc.exe from the command line now so you have to manually change the setting in the additional command line string if you have a different preference.

The part to change is -q 0.5 what that tells the encoder to do is make a VBR (variable bit rate) of .5 quality (very high quality) this is probably good for 99% of you as is, but if you want a different quality file or do not want to use VBR change the setting.

Quick and Dirty Settings Guide
VBR (variable bit rate)is the best it uses the tag -q and has a range from 0.00 to 1.00, the .5 setting I used is very high quality, most people use about .35 for high quality. (-q .5)
CBR (constant bit rate) is the worst to use and not recommended it uses the tag -cbr and uses the value of the bit rate you want like 192000 would give you 192kb/s file. (-cbr 192000)
ABR (average bit rate) is in the middle in quality and uses the tag -br and uses the value of the bit rate you want like 128000 would give you a 128kb/s file. (-br 128000)

Setup is complete time to use it!

1.) Put your CD in your drive
2.) Go to Database --> Get CD Information From --> Remote FreeDB, this will tag all your songs for you and name them
3.) Press Control + A to Select All Track (or pick just the tracks you want)
4.) Right Click and Select Copy Selected Tracks --> Compressed
5.) The save dialog will come up and let you choose a location, the save name will say "ignore file name" thats what you want it will name the file for you based on the tag information.
6.) Wait it can take a while if you used the accurate rip method, but when its done you will have a AAC encoded .M4A file with all of the tag information inside, once the setup part is complete this makes ripping many CD's very fast and easy and saves you all the work of first ripping and then encoding or adding tags after the AAC encoding.

Sunday, January 30, 2011

53. Internet Safety Guide: How to Protect Yourself Online

By: Charles P. Jefferies from Notebookreview.com

Internet threats continue to pose a problem for anyone that surfs the Internet -- and yes, that includes you reading the headline and thinking you know it all. In this article we will show you how to protect yourself using some "best practices" for safely surfing the Internet, all without spending a dime.

Background on Internet Threats

Anyone can throw around terms such as "spyware" and "viruses", but what exactly are they? It helps to know before trying to figure out how best to avoid such problems. Here are the basics:

  • Malware: Short for "malicious software". Resides and runs on a user's computer without their consent or knowledge. Malware can be used as an all-inclusive term for viruses, spyware, keyloggers, worms, and Trojan horses, and other Internet threats.
  • Spyware: A type of malware that collects information about users, including personal information and habits (sites they visited). It can also trigger popups and install additional malware.
  • Virus: A type of malware that can replicate itself and infect other computers through a network or media (such as a flash drive). Viruses can do multiple harmful things to a user's computer, such as taking it over and using it for malicious purposes.

Three Steps to Internet Safety

This guide will take you through three relatively simple steps to protect yourself on the Internet:

  1. Install Mozilla Firefox
  2. Install the McAfee Site Advisor tool
  3. Change your online habits

Step One: Install Mozilla Firefox

Yes, "Install Mozilla Firefox" may be clich; however, there is sound reasoning why this is a good piece of software. Let's cut the marketing nonsense -- here are the tangible things I like about Firefox:

  • Pop-up blocker: Pop-ups are perhaps the most annoying form of advertising, and Firefox takes care of them for you. It will let you know a pop-up was blocked in case you were expecting one.
  • Unsafe site warnings: If you go to a website that is fraudulent, untrusted, or has known security problems, Firefox will actually prevent the site from loading.
  • Integration with anti-virus software: Firefox works with your resident anti-virus program to scan downloaded files for security threats.
  • Automatic updates: Firefox automatically updates itself, so your defenses stay current.
  • Private browsing: Firefox normally remembers what websites you visited, however in private browsing mode (which is easy to toggle on and off), it will not remember anything you did. This feature is handy when logging into banking sites that you want to leave no trace of on your computer (or someone else's). Private Browsing can be activated from the tools menu and clicking "Start Private Browsing"; do the same to turn it off:

Internet Safety Guide  firefox private browsingWithout further delay, follow this link to Mozilla's official website and download Firefox for your computer.

Firefox is a small 8MB download. Click Download and then save the file to your computer to a location you know (such as My Documents). Double-click the downloaded file and install Firefox with the default settings. Done? Great! Those familiar with Internet Explorer should be able to adapt to Firefox without much trouble -- it gets natural after a day.

Step Two: Install the McAfee Site Advisor Tool

Internet Safety Guide  select mcafee site advisor searchCertain websites are created with malicious intent; for example, some might try to infect your computer with malware and others might be fake phishing sites designed to steal your personal information. McAfee, a computer security company, has a Site Advisor tool that displays ratings next to links in search engines (such as Google and Yahoo), indicating whether or not the listed sites are safe (see here for thorough information on how it works). Site Advisor works with both Mozilla Firefox and Internet Explorer. Simply download and then install McAfee Site Advisor using the default settings (leave everything as-is, though I recommend unchecking the option to install the unnecessary Yahoo toolbar).

Once installed, restart Firefox and test Site Advisor out. Make sure your default search provider is set to McAfee first -- in the top right next to the search box, click the down arrow and select McAfee Secure Search:

Now search for something and check out the results page -- each link has a little icon next to it that indicates whether the site is safe or not.

Internet Safety Guide mcafee  site advisor secure search results

Green means good, yellow is caution, and red means unsafe/untrusted. A question mark indicates the site has not been scanned yet. As a rule of thumb, only click on the green links.

Below is an example of what search results look like after installing the Site Advisor tool:

And yes, NotebookReview.com is totally safe -- but you knew that.

The Site Advisor tool is great to have when you are searching for things you do not usually search for (and thus might be unfamiliar with sites that come up). It never hurts to double-check. As always, use your judgment when clicking on links. If something is too good to be true, it is.

Step Three: Change Your Online Habits

The single greatest danger you face on the Internet is yourself. More specifically, there is no software that can compensate for your poor Internet safety habits.

Let's start with how much critical information you willingly give away. This is the Internet -- information posted online can be seen by almost anyone, and secure websites can be hacked. Even restricted pages such as your Facebook profile are not entirely safe -- someone with access (such as your "friends") could copy and paste the information to a Web page that isn't truly private. The bottom line here is that you need to be extra careful with yourself on the Internet. Below are a few of the habits I see daily that present huge security risks to the users:

? Connecting to unsecured wireless networks: You know that coffee shop down the street that offers free Wi-Fi? That free Wi-Fi access could cost you a lot if it is unsecured (Windows will indicate whether a network is secured/unsecured when you try to connect). An unsecured connection is an open network that allows anyone to connect -- information passed from your laptop to the wireless router and vice versa can be intercepted by people with the right tools since it is not encrypted. Additionally, network attacks can be made from other computers connected to the network.
Internet Safety Habit: Avoid unsecured Wi-Fi

? Accessing secure websites in public: Even on a secured network, remember that people can see what you type on your laptop screen. All it takes is one person to walk by with a camera phone and snap a picture of your online banking page. The same is true at your office, where all it takes is one nosy coworker poking over a cubicle wall or an unscrupulous network administrator spying on your workstation to snag your passwords.
Internet Safety Habit: Access secure websites only at home

? Saving personal information on shopping websites: Most shopping sites offer to save your credit card and address information for easier checkout in the future. While this is convenient for the few sites you shop at regularly, please do not opt to save info on every site you shop. Though the information is supposedly secured, successful hacking attempts have occurred in the past and personal data has been stolen. Also, there are too many stories of personal information getting "lost".
Internet Safety Habit: Don't save credit card numbers on shopping sites

? Posting personal information on social networking sites: I find it amusing that people post the details of their personal lives on social networking sites such as Facebook, give a platoon of their "friends" access, and then complain about privacy issues. Am I the only one that can see the issue here?
Internet Safety Habit: Only post information online you want everyone to see

? Keep your computer personal: Internet browsers such as Internet Explorer and Mozilla Firefox make it easy to store password and form information (such as names and addresses used in order forms). Anyone that opens the web browser on your computer can check your browsing history, visit your "secure" sites (like your Web-based email) and automatically log in as you because you opted to have the browser save your password. Avoid storing passwords, or better yet, password-protect your computer and lock it when not in use (press the Windows key and L to lock your computer). Make a second account on your computer for other people to use so your information is kept separate, and make sure that account is password-protected and not an administrator.
Internet Safety Habit: Never save passwords on any computer that you share

? Do not install software you do not explicitly want: Many software vendors try to sneak additional pieces of software on your system during the install process. For example, toolbars for your Internet browser, updater tools, and other unnecessary (and annoying) items. If you wanted those pieces of software, you would have installed them on your own.
Internet Safety Habit: Install as little software as possible

Conclusion

Your online safety is 10% dependent on someone else and 90% dependent on you. The majority of risk factors can be controlled through the simple steps outlined in this article. Number one -- control the online environment with a safe web browser. Mozilla Firefox has numerous advantages -- it prevents you from going to malicious sites, scans files you download, blocks pop-ups, and helps safeguard personal data. Number two -- links in search engines can be dangerous. McAfee's Site Advisor tool helps identify which links are safe and vice versa -- know something about a website before you click. Lastly, consciously think about your online actions and what you do with your personal information. Avoid unsecured wireless connections, lock your computer with a password when not in use, stop saving your credit card information on every site you visit, and last but not least, do not post information on Facebook you would not be comfortable sharing with the rest of the world.

These simple tips can help safeguard you from the majority of online threats. Your judgment plays a larger role than any piece of software can. Use the tools and tips mentioned in this article to stay safe.

Happy surfing.

Sunday, December 12, 2010

52. Windows PC Optimization Guide Part 3

By: Charles P. Jefferies from Notebookreview.com

In part three of our computer optimization guide we wrap-up with some final performance tips. This part focuses on Diskeeper 2010 Professional, a tool to optimize your hard drive.

What is fragmentation?

Imagine that a hard drive is like a filing cabinet. Your computer places files and folders into this filing cabinet and accesses them when needed. The computer's problem is that it does not insert files and folders into the cabinet in any particular order. Making matters worse, a single file may be fragmented into many small pieces when saved to the hard drive, like taking pages from one document and putting them into different drawers. This drags down performance because when the computer wants to access a file it has to go to several different locations on the hard drive, and accessing data on a hard drive is not instantaneous.

Defragmentation has the opposite effect of fragmentation -- it takes those fragments and consolidates them, putting the hard drive back in order. This generally means the hard drive only needs to go to one location to access a file, which is very beneficial for performance. The hard drive is the absolute slowest component in any computer, about 1000x slower than the next fastest component (memory/RAM). Therefore, any increase in performance will be noticeable.

In this article, we will be looking at a product called Diskeeper 2010, which is designed to handle and prevent fragmentation.

Diskeeper 2010 Overview

Diskeeper 2010 Professional is a $59.95 storage device performance optimizer. The price seems steep given there are many free defragment products on the market (Windows has one), but Diskeeper is more than a simple defragmenter. Diskeeper includes several notable technologies that are designed to keep a computer running in top shape.

IntelliWrite -- this technology helps prevent fragmentation from occurring; it is claimed to prevent fragmentation up to 85% by intelligently writing files to the hard drive.

InvisiTasking -- this technology allows for real-time defragmenting, meaning it is no longer necessary to leave your computer alone while defragmenting it.

I-FAAST -- this technology monitors your activity and moves the most commonly-accessed files to the fastest locations on the hard drive.

Boot time defragmentation -- Diskeeper can defragment the Windows boot files and other system files during startup; these files cannot be moved around while Windows is running.

Diskeeper has some other notable features including the ability to defragment a hard disk with less than 1% free space (most defragment products need a certain % free space to move files around) and 64-bit operating system support.

Diskeeper 2010 Overview

Diskeeper interfaceDiskeeper has a straightforward interface; the main page shows storage volumes present on the system and shows which Diskeeper technologies are enabled on it.

It is simple to enable and disable technologies; the icons at the top launch setup windows for each. For our test system, we enabled IntelliWrite, automatic defragmentation, I-FAAST, and performed a boot time defragmentation.

At the bottom of the interface is the Dashboard -- this presents real-time statistics for your hard drive. It shows, for example, how many fragments were prevented, a read/write time performance improvement, volume health with recommendations, and resource usage by Diskeeper. This information is generally unnecessary to keep tabs on, but enthusiasts and those wishing to learn a bit how their hard drive operates will enjoy it.

In Use

Automatic Defragmenting

Diskeeper statusDiskeeper's automatic defragment feature worked seamlessly -- while the hard disk activity light was frequently active on our test computer, we noticed no choppiness or stuttering as a result. Diskeeper actually allows users to watch how it is using resources (as shown above); it only defragments the volume when sufficient resources are available and it will not affect your computing experience -- this was definitely the case for us. A traditional defragmenter basically requires users to leave the computer alone for several hours while it works due to performance slow-downs associated with disk activity.

After just a few hours of having automatic defragmentation enabled, our hard drive went from the readout on the left to the readout on the right (the red is bad):

Diskeeper before defragDiskeeper  after defrag

Diskeeper eliminated nearly all fragmentation without us knowing -- very nice.

Fragmentation Prevention & Handling

Diskeeper IntelliWriteDiskeeper reported that IntelliWrite prevented 87% of the fragmentation that would normally have occurred on our test machine -- very impressive. Combined with automatic defragmentation, it kept our hard drive in top performance shape with no interaction on our part.

Additionally, Diskeeper reported that IntelliWrite improved read and write access time for fragments by 50% but we have no way to verify this.

Boot Time Improvements

Boot time defragmentation, which is designed to reduce startup time by optimizing boot files, worked well. On our test system, an HP ProBook 5310m notebook with Windows 7 Professional 32-bit and a 320GB 7200RPM Seagate hard drive (ST9320423AS), we measured boot times from the point the Windows logo appeared to the log-on screen.

Before boot time defragment: 13.5s

After boot time defragment: 12.4s

This is about a 10% improvement; our test system is blazing fast as it is, so any increase here was impressive and would only be magnified on slower systems.

Diskeeper Conclusion

Diskeeper is an impressive product in its own right. If it were simply an after-the-fact defragmenter we would likely not be impressed, however its active features -- preventing fragmentation by intelligently writing data to the hard drive and on-the-fly defragmentation -- were impressive and saved us from doing it manually. Diskeeper even goes so far as to optimize frequently-used files for faster access. We experienced no issues with Diskeeper running in the background. While it is not possible to numerically gauge the performance improvement from defragmenting the hard drive, we observed a noticeable performance improvement after having Diskeeper installed for a few days; commonly used programs opened faster and boot time improved. Additionally, we noticed shut-down and log-on times were also reduced. We feel Diskeeper's $59.95 price tag to be somewhat steep, but for those wanting to squeeze the best performance possible out of their hard drives, Diskeeper 2010 is the product to buy.

Pros

  • Seamless defragmentation
  • Prevents fragmentation
  • Provides real-time disk statistics
  • Easy to use

Cons

  • Steep price tag

Computer Optimization Guide Conclusion

In our three-part guide we showed you how to not only improve your computer's performance, but also how to improve your productivity by changing the way you actually use your computer. In part one we went over basic performance improvement tips (reducing startup items to improve log-on time and free up resources, getting rid of unused programs, cleansing the system of junk files, and organizing your files); in part two we showed you handy keyboard shortcuts to improve your productivity (a faster approach to navigating through Windows and text editing) and how to back up your files; lastly in part three we demonstrated how Diskeeper 2010 can help keep your system in top shape. We hope this series has taught you something and improved your computing experience -- remember to pass the tips along!

Friday, November 19, 2010

50. Windows PC Optimization Guide Part 1

By: Charles P. Jefferies from Notebookreview.com

This three-part series is designed to help everyday computer users improve their productivity by optimizing their computer's performance, making use of handy shortcuts in the Windows operating system, and creating and maintaining a backup schedule. Let's get started with part one, improving performance.

The first part of this guide will cover optimizing computer performance. The directions are aimed at Windows Vista and 7 users; XP users can also follow along though not all steps will be the same.

Disclaimer: You follow the advice in this guide at your own risk. NotebookReview.com is not responsible for any damages or otherwise.

Remove Unnecessary Startup Programs

Performance benefit: High

Difficulty Level: Medium

Windows PC Optimization Guide msconfigA program is typically only run when needed -- for example, only running Microsoft Word while typing a document. Unfortunately, many software vendors think that their software needs to run all the time in the background for whatever reason, checking for updates, pre-loading, and so on. My response to these vendors is: No. There are specific programs that need to run all the time -- antivirus, mainly -- but no reason that applications such as Apple's QuickTime need to sit around and take up resources. We are going to prevent these programs from starting up with Windows (and therefore slowing down your logon time). The programs will still function fine; they will simply not run when not needed.

Press and hold down the Windows Key and then press R; this will open up the Run prompt. In the box, type msconfig and click OK. This will bring up a System Configuration window:

Click on the Startup tab:

Windows  PC Optimization Guide msconfig startupThe startup tab shows all programs that can start with Windows; if an item's box is checked, that means it is run during startup.

If your computer is like mine, there are a lot of programs installed on it and chances are a lot of startup items to complement them. Our goal is to reduce the number of startup items to a minimum.

The hard part is determining which items can be disabled. Some items have a descriptive name such as "GoogleToolbarNotifier", but others may not even have a pronounceable name. I am not able to provide a full list of what can be unchecked, but in general the following can be without consequences:

  • GoogleToolbarNotifier (associated with the Google Internet browser toolbar)
  • Jusched (Java update scheduler)
  • Acrotray (associated with Adobe products)
  • WinZip Quick Pick (associated with the WinZip compression application)
  • Qttask (Apple QuickTime)
  • iTunesHelper (Apple iTunes)

The items listed above are nothing but a complete waste of your computer's resources (RAM) and add extra time onto startup -- disable them by simply unchecking the boxes and clicking Apply. Exit msconfig when done and restart your computer to finish. You can disable as many items as you want at one time.

To find if you can disable more items, do an Internet search for the name and see what comes up. Be sure to cross-reference the results to verify what you are reading is accurate. By reducing the number of startup items, your computer's boot-up and log-on times and RAM usage will be greatly reduced.

Uninstall Unused Programs

Performance benefit: Medium

Difficulty: Easy

Windows PC Optimization Guide uninstall programsAs noted I install a lot of programs on my computer, yet I rarely use most of them. These unused programs take up hard drive space and may be eating up additional resources if they are running in the background. They also clutter the programs list. It is time to do a little housecleaning.

The first step in this process is figuring out which programs you need and do not need. Click Start and then All Programs; make a list of them.

Now let us get rid of the programs you do not use. Click Start and then Control Panel, then "Uninstall a Program" under Programs. It may take several minutes for this window to load completely.

Get started -- remove the programs on your do not use list. Double-click the item in the list and follow the accompanying wizard to uninstall it. Be careful -- do not uninstall programs blindly. If you do not recognize an item then do an Internet search for that item and cross-reference the results. Only uninstall items you are sure are extraneous.

Clean Out and Organize Your Documents

Performance Benefit: Little

Productivity Benefit: High

Difficulty: Easy

Windows  PC Optimization Guide My DocumentsThis is another chore I always put off -- cleaning out and organizing the "My Documents" folder. I download a great deal of programs and files from the Internet, and every time I save something I blindly dump it in My Documents. After a few months, My Documents gets uncomfortably crowded and finding items becomes nearly impossible without using search. Last week I finally got fed up and organized everything.

While organizing files has little performance benefit, the productivity benefit is high. Organized folders make it far easier to locate files, which save time.

Everyone will have a different style of organizing their personal documents; I order by category (for example, my Pictures folder is organized by the location where I took the pictures) and then by date -- this makes it simple to drill down into different categories. Regardless of your organizational style, remember the idea is to keep the number of clicks required to get to commonly-accessed content to a minimum.

Clean Out Your System with CCleaner

Performance Benefit: Medium

Difficulty: Easy

Windows PC Optimization Guide CCleanerThis final step in this guide is probably the simplest of all. CCleaner is a freeware application -- it can be downloaded here. Install the program once downloaded and launch it (click Start, Programs, CCleaner, CCleaner).

This program will scan your computer's hard drive for unnecessary files and other items strewn about by careless programs (temporary files and so on). The program defaults are safe; if you want to save your Internet Explorer browser history, be sure to uncheck that box. For Firefox users, click the Application tab and uncheck the same box under Firefox.

To clean the hard drive, click "Run Cleaner" and let the program go; it may take some time to run.

Conclusion

This wraps up part one of three of the NotebookReview.com Computer Optimization Guide. Following the steps in this guide should yield a healthy increase in performance. Stop back for part two, which will show you handy Windows shortcuts and detail how to create and maintain a backup schedule.

Friday, September 24, 2010

51. Windows PC Optimization Guide Part 2

By: Charles P. Jefferies from Notebookreview.com

NotebookReview's Computer Optimization Guide is designed to help you and your computer work faster together to be more productive. In part one we focused on improving your computer's performance, and now we will focus on improving the way you use a computer.

This guide is aimed at Windows XP/Vista/7 users with a basic understanding of computer operation and usage.

Learn Windows Shortcuts

A computer typically has two input devices -- a keyboard and a mouse. While it is straightforward to click on things on-screen, there is a faster way to navigate through programs and give commands -- the keyboard. Just about every Windows user knows Ctrl + Alt + Delete, but do you know any more? You will.

Windows XP/Vista/7 Generic Keyboard Shortcuts

  • Alt + F4: Closes the current window/program
  • Alt + Tab: Holding down Alt and pressing Tab once switches to the previous window you were using; press tab again to switch to the next window
  • Windows Key + F1: Launches Windows help from any program; pressing F1 will launch help for the current program
  • Windows Key + M: Minimize all windows; press Windows Key + Shift + M to undo minimize
  • Windows Key + D: Show desktop
  • Windows Key + E: Open Windows explorer
  • Highlight any icon/file in Windows Explorer: Press F2 to rename

Windows 7 Specific Shortcuts

There are some shortcuts specific to Windows 7 that really come in handy:

  • Windows Key + Up Arrow: Maximizes current window
  • Windows Key + Down Arrow: Minimizes current window
  • Windows Key + Left/Right Arrow: Docks current window on left or right side of screen
  • Windows Key + Home: Makes all windows transparent except the current window
  • Windows Key + Space: Hold to make all windows transparent

Edit Text Faster with Keyboard Shortcuts

Anyone who types on a regular basis is going to find the following shortcuts extremely useful. They are generic and should work in almost any text input area -- Microsoft Word and so on.

  • Ctrl + A: Selects everything
  • Ctrl + C: Copies selected area
  • Ctrl + V: Pastes copied text
  • Ctrl + X: Cuts selected text
  • Ctrl + Z: Undo
  • Ctrl + Y: Redo
  • Shift + Arrow Key: Highlights text in that direction from wherever the cursor is (try it!)
  • Ctrl + Arrow Keys: Left/right arrow keys go to end/beginning of words, up/down go to beginning of previous/next paragraph
  • Ctrl + Shift + Arrow Keys: Left/right arrow keys highlight previous/next word, up/down highlight previous/next paragraph

Create and Keep a File Backup Schedule

Corrupted and failed hard drives are the biggest productivity killers of all time -- nothing is worse than losing all your data. For this guide I am going to demonstrate how to do file backups with a free tool from Microsoft called SyncToy -- it can be downloaded here. You will also need a storage device such as an external hard drive or flash drive.

1. Install SyncToy and launch it.

2. Let's assume we want to back up My Documents; on your external storage device, create a folder called My Documents Backup.

3. Now we will use SyncToy to sync the folders in your My Documents folder to the My Documents Backup folder on the external drive.

4. Windows PC Optimization Guide -- Part Two new Sync Toy pairClick Create New Folder Pair at the bottom of SyncToy; it will bring up the window shown to the right

5. The way this works is that the left folder will be synced with the right folder; assuming we want to back up My Documents, click Browse on the Left, select My Documents, and click OK. On the right, select the My Documents Backup folder you created on your storage device and click OK.

6. Click Next; there are three options here. Synchronize is what most will want to do -- it will sync the folder on the left (My Documents) with the folder on the right (My Documents Backup).

7. Click Next; give the action a name and click Finish.

8. Repeat steps 1 -- 7 for however many folders you want to backup.

Windows  PC Optimization Guide -- Part Two all Sync Toy pairsNow that you have created all folder pairs it is time to run them, therefore syncing all of the folders on your computer to the external storage device. Assuming you want to run them all at once, click the All Folder Pairs item at the bottom:

Click Run All and the syncing will commence. The first sync will take the longest since all of the files need to be copied, but sequential runs will go faster since only new/updated files will be synced.

Ideally, back up your files once per week -- it will take mere minutes and for that you will have the invaluable security of having your data backed up. Just connect your external hard drive, open SyncToy and click Run All - that's it.

Conclusion

In part one of this guide we showed you how to improve your computer's performance, and today we showed you valuable shortcuts and a data backup plan to keep you as productive as possible. Stop back for part three, where we go over additional performance and productivity tips.

Sunday, November 29, 2009

49. Windows Vista Backup & Restore Center Review

By: Greg (Greg Ross) From: NotebookReview.com

While many previous versions of Windows include have some type of archival utility, Vista Backup & Restore Center is billed as the first Windows system restore tool that could replace aftermarket data retention software. Does this free utility have what it takes? Or is the Backup & Restore Center yet more bloatware from Redmond? We make the call inside.

INSTALLATION & SETUP

Windows Vista's Backup & Restore Center is included with the operating system, so there is no explicit installation involved with this utility. However, the Backup & Restore Center comes in two flavors. Windows Vista Home Premium's version has the ability to backup only user files and folders, while Vista Business and Ultimate's version can also backup entire partitions and hard drives. (Don't you love Microsoft for gently pushing you towards purchasing Ultimate?)

During this review, we will be covering all of the features accessible from within Microsoft Vista Ultimate.

PROGRAM INTERFACE

Windows Vista Backup & Restore Center first open screen

Users can access the Backup & Restore Center by clicking on the Start Menu and opening up the Control Panel. From there, clicking on the Backup & Restore Center icon causes the opening window, shown above, to pop up.

The interface itself is simple, compact, and quite informative. Backup and restoration operations can be easily executed by clicking on the appropriate buttons from within this screen. All of the options are self-explanatory. Unlike some tools reviewed in this series, the Backup & Restore Center only contains barebones information about backups. It does not include any kind of task log that indicates the status of previous backups, but simply what time the last backup was completed.

Windows Vista Backup & Restore Center Status and Configuration Window

The Start Menu also has a well hidden link to the Backup Status and Configuration window, which also summarizes the status of backups on the computer. The tabbed interface breaks this up a little more for the user, which is somewhat unnecessary considering how few options available in the Backup & Restore Center. The first tab of this window, shown above, is dedicated solely to file and folder backups for users.

Windows Vista Backup & Restore Center recovery options tab

The status window also gives the user access to recovery options. Files and folders can be restored from archives created on this computer or created on another computer, but there really is no reason to present these recovery operations as two entirely different choices, is there? If this interface was not so broken up perhaps, Microsoft would not have to look for ways to fill out the window space with extra buttons.

Windows Vista Backup & Restore Center backups status tab

Finally, the last tab reveals information about full computer backups, and provides quick access to the backup wizard.

Honestly, we see no need for the Backup Status and Configuration link in the Start Menu. Why not just provide a link to the full Backup & Restore Center? The interface practically doubles up on everything between these two windows, and it unnecessarily muddies the quality and user friendliness of the interface.

FILE AND FOLDER BACKUP AND RECOVERY

Windows Vista Backup & Restore Center file backup wizard

In order to begin the backup process that protects user data, open up the Backup & Restore Center and hit the Back Up Files button. A new wizard pops up that immediately inquires where the backup should be stored. Network locations or physical hard drives are the only allowable destinations, Vista does not allow users to backup files to a rewriteable CD/DVD or a USB memory key.

Windows Vista Backup & Restore Center backup partition selection

Once the backup destination is selected, Vista asks which partitions should be included in the backup. By default, the main system partition is selected -- and there is no choice to de-select it. While partition-level backups are certainly useful, it would be nice if there was a way to specifically choose files and folders to be backed up.

Windows Vista Backup & Restore Center file type selection

While choosing specific locations or files is not possible, Vista's Backup & Restore Center does allow users to choose what types of files are preserved in an archive. This does provide some versatility but Vista is not very clear as to what specific files are preserved. For instance, the window above provides no insight into whether selecting Music files will backup just WMV files, or other popular formats like MP3 or even Apple's M4A iTunes music files.

Windows Vista Backup & Restore Center scheduler

After selecting file types for backup, the actual backup operation has to be scheduled. Daily, weekly, and monthly schedules are available though Vista limits backup operations to once per week or once per month when the respective options are chosen. No other explicit actions -- like a system error or an application install -- can prompt a backup job outside this schedule.

When a backup job is complete, the destination hard drive will have a new folder named after the computer. Within that folder will be a series of additional folders that containing all of the preserved files, compressed and archived in their native formats. It might be a bit tedious, but by browsing through all the folders we can get a solid idea as to which files were backed up (or not).

When the backup runs on schedule, testing hinted that Vista only stores files that have changed since the last backup. This incremental backup routine definitely saves on hard drive space, though it does require that users never delete the data in these archives!

Windows Vista Backup & Restore Center recovery wizard

If any files need to be restored from the archives, selecting the Restore Files button starts up the recovery wizard, shown above. The most recent archive, one of the previous archives created, or an archive from a completely different machine (click on the 'Advanced restore' link to get this option) can be selected as the data source.

Windows Vista Backup & Restore Center recovery summary

The Backup & Restore Center wizard then displays a summary window that provides a list of all the files that are to be recovered. If only a select few files need to be restored but their location is unknown, the wizard is capable of searching through the archive. Specific files and folders can also be chosen from within the interface. The wizard then asks if the files should be restored to their original location or to another destination.

While testing indicated that backing up files (subject to previously discussed limitations) and restoring them worked, we noticed a few quirks during the process. For one, restoring a folder does not actually restore folders to the condition they were in during the last backup. It merely copies the archive files to the destination. Any files that were created in the folder after the backup that were not overwritten will still be there, so Vista does not really recover entire folders, it just dumps old versions of data into them along with any more recent additions, for better or worse. That said, restoring individual files is easy and it works.

SYSTEM BACKUPS AND RECOVERY

Backing up an entire system starts with clicking the Back Up Computer button from within the Backup & Recovery Center. From there, the process basically runs the same way as file and folder backups. Select a destination drive, then select the partitions to backup, and then confirm the settings. However, once the settings are confirmed, the utility archives the entire hard drive as a type of virtual disc drive much like those used in virtual machines (VMware, Microsoft Virtual PC, etc).

The actual backup does not take more than a few minutes with the barebones Vista installation put in our test-bed system for purposes of this review. Other computers in the office did take up to 30-45 minutes to backup the system partition, but those computers needed to archive 40 to 80 gigabytes of files.

Windows Vista Backup & Restore Center restore computer wizard

Restoring a complete system involves starting up the Restore Computer wizard and reading the heart-stopping warning shown above. Microsoft needs to be a little clearer about what data or partitions are going to be destroyed. At least the wizard tells you what you need to do next; hopefully you have a Windows Vista installation disc nearby, because the process won't work without one. There is no tool included with the OS to make any kind of recovery disc, which is a disappointment considering Microsoft knows a majority of computer owners probably do not have this disc. If you do not have a Windows Vista install disc, try to get a media replacement from Microsoft, beg your laptop manufacturer to mail you discs, or borrow a disc from a friend.

To start the system restore, insert the Vista install disc into the computer, reboot, and when prompted hit any key to boot to the CD. If you have not reinstalled Vista on any computer before, welcome to the Vista installation wizard. Be careful while you are in here, and pay attention to the options presented, to avoid doing something dangerous (like reformatting the hard drive that has your backup files on it).

Windows Vista Backup & Restore Center repair your computer

Choose the language preferred, and then hit the option to Repair Your Computer. You will then be asked to confirm which Vista installation needs to be fixed. More likely than not, there will be only one choice to select.

Windows Vista Backup & Restore Center recovery options

A few diagnostic utilities are available from this page of the wizard, only one of which we care about right now. Select the option to restore the PC from a backup, and the wizard will automatically search for the appropriate backup file.

Windows Vista Backup & Restore Center recovery file selection

If the wizard selects the wrong one, or cannot find it, there will be an opportunity to manually choose a file. In our case, the restoration wizard instantly recognized the correct file.

Windows Vista Backup & Restore Center recovery summary

A summary of the recovery operation as configured will be presented, and one final option will appear. Microsoft really needs to make this part of the wizard more explanatory, because we honestly had no clue which partitions on our test bed system would be obliterated during the restoration operation.

After a few minutes, the recovery operation was complete and the computer was ready to reboot. Vista booted up and started running without any issues, so we immediately checked on all the other partitions on the computer to make sure the recovery had only wiped out the target main system partition.

We selected the option to reformat the disc during recovery, and that reformat only affected the partition being restored. If that option was not chosen, would the recovery wizard merely have copied files over like it did with the file and folder wizard?

So we ran another recovery operation, and did not choose to reformat. Then Vista's boot CD asked to confirm that we understood the recovery would erase the partition.

Once again, we are left clueless with Microsoft's interface. But at least the recovery worked, which is more than one or two applications in our roundup can say.

CONCLUSION

Microsoft Vista's Backup & Recovery Center has most of the basic features needed in a backup utility, but the utility is a mixed bag at best. It can schedule file backups, but not operating system backups. Verifying user data backups is quick but not entirely easy, while verifying partition backups is not possible without maybe some third-party applications. The Backup & Restore Center can be configured to selectively choose types of files to backup, but the program does not inform the user exactly what file extensions are (or are not) included with those choices. The user interface was sometimes friendly, but often confusing when we were running recovery operations. During these operations, some of Microsoft's prompts about reformatting scared us enough to take extra precautions to protect important files on our test bed system. Considering this utility is supposed to be reassuring, not alarming, these warnings did more harm than good.

In the end, Vista's Backup & Recovery Center does work, but you have to fork out the cash for Vista Business or Ultimate to access half of the features of this utility. For those looking for a short-term stop-gap solution, on too tight of a budget to afford third party backup and recovery software, or only need a backup utility for one-time partition backups, then this utility will get you through. But if you are looking for more flexibility and a program that is open about what it is actually doing, look elsewhere.

PROS

  • Simple wizards
  • Free with Vista Ultimate
  • No driver conflicts

CONS

  • Requires Vista install disk
  • Many wizards confusing
  • File "recovery" = copy & paste

Wednesday, September 16, 2009

48. Gamers Graphics Tuning Guide

By: Pulp (Dustin Sklavos)
From: NotebookReview.com

Even if you've got the latest and greatest CPU, graphics card, widescreen monitor and cutting edge video game, odds are you're not enjoying the ultimate gaming experience. Why? Because you're gaming on the default graphics settings. No matter how old or new your gaming rig, you can probably squeeze even more performance from the system by following the tips in this Gamers' Graphics Tuning Guide.

This information applies to both desktop and notebook users alike. We'll cover how to make your in-game visuals look their best, and how to do some basic performance optimization for your games by slightly (or significantly) tweaking your graphics settings.

BASIC KNOWLEDGE

There are two things you're need to know about your system: What is the monitor's native resolution? and What make and model is my graphics card?

In lay terms, your monitor's native resolution is the number of pixels (measures as width by height) the screen is designed to produce. The specification is available online for either your monitor or your notebook. The model number proper will be on the bottom of the notebook or the back of the monitor. If the specification given by the manufacturer uses a letter abbreviation like WXGA, you can check our How it Works: Screens guide to translate these codes into actual resolution numbers.

Your monitor will deliver its best picture at its native resolution. You can run a lower resolution, but for more information on that (and other tasty tidbits) it would be helpful to go back and check the aforementioned Screens guide.

The model of your video card or "display adapter" is listed on your system's specification sheet. If your desktop was custom-built you probably know this already. To learn more about the fundamentals of graphics hardware, you'll want to check out the first page of our Mobile Graphics Guide for 2009, which is largely applicable to desktop hardware as well. Optimizing your graphics output based on your graphics card is much, much trickier than just changing your software resolution to match your hardware resolution. We'll take it step by step in the sections below.

A BRIEF ANATOMY OF A GPU

Basically, with any graphics hardware -- also known as a graphics processing unit (GPU) or video card -- there are three characteristics that most greatly define performance: Memory size, memory bandwidth, and architecture.

Memory size accounts for how much data can actually fit in the video card's memory, space reserved largely for textures and filtering operations. I want to be clear here: More graphics card memory does not always equal better graphics. Some cards simply aren't fast enough to properly handle more than the currently preferred 512MB of on-card memory. Higher-end cards (Radeon HD 4800 series, GeForce GTX and GTS series) are powerful enough to make use of a full 1GB of on-card memory, but even they see virtually no improvement going past one gig.

With memory size comes memory bandwidth, defined by the type of memory used and the memory bus width. More details are available in our graphics guide, but it basically boils down to this: Higher memory bandwidth improves performance. A GPU equipped with DDR2 RAM or (heaven help you) memory shared from system RAM will be severely crippled in this respect. Lack of memory bandwidth is the single biggest graphics performance bottleneck I continue to see on any system.

Finally, there's the least tangible graphics factor: Architecture. ATI/AMD and Nvidia's designs differ from generation to generation and between one another, and these differences can have a direct impact on graphics performance. Certain games run better on Radeons, others thrive on GeForces, based on how developers structure their code. Dead Space, for example, runs nearly 100 percent faster on some GeForce GPUs. For what it's worth, Radeons still run that particular game beautifully, unless you feel like you can perceive the difference between 60 frames-per-second and 120.

While Nvidia's cards have scaled pretty linearly from generation to generation since they released their 8000 series so long ago, ATI/AMD has a massive break between the 2000/3000 generation and the 4000 generation. Parts from the 4000 generation are far more efficient than their predecessors. I personally own a Radeon HD 4870, and previously owned not just one but a pair of Radeon HD 3850s and the 4870 completely outclasses them in every way. The desktop Radeon HD 4670, even with half the memory bus of the 3850, still performs on par with it.

So how do these three characteristics ultimately shake down when you're configuring your game? Let's find out.

IN-GAME SETTINGS

One of the joys of PC games is that they can look better than their console versions, provided you know how to tune your gaming rig. Most games offer some variants on these settings, some more and some less, but the analogs will be present more often than not. While we may namecheck a few hard limits and settings levels, the best way to tune your game rig is to tweak each of these setting individually and then observe their effects on actual game performance. In most every case, turning these settings down will improve game performance at the cost of visual appeal, so only you can know where your sweet spot for speed-versus-pretty is located.

Resolution

In-game resolution settings can have the strongest impact on your graphics performance. Typically, the biggest limiter of this can be memory size, but if your GPU is equipped with DDR2 memory, shared memory, or a small memory bus (think 64-bit), you will hit a hard limit on available resolution very quickly. The memory bandwidth simply won't be enough to handle the amount of information streaming between the memory and the GPU, and I've seen otherwise decent hardware take a swan dive in performance when game resolution was raised too high. If your graphics hardware is relatively low-end (as in no on-card memory) you may be confined to running at 1024x768 or under.

Texture Detail

Texture detail is affected most heavily by memory size. If you don't have a lot of memory to go around, consider reducing texture detail to spruce up game performance. The game world around you -- such as details on the ground, walls, rocks, and other large solid objects -- will appear a bit blurrier as a result, but your game will run faster and with more fluidity.

Shadows

Shadows and shadow detail have had a significant influence on the performance of recent games. Typically, diminishing or disabling shadows will directly speed up game play. That said, shadow performance often scales with GPU processing power. A GPU with a high amount of shader power (related to architecture) isn't going to break as much of a sweat with a lot of shadows, but mid and low-end cards may start bawling with Shadows set too high.

Shaders

The term "shaders" is a bit all-encompassing, but generally shaders make things "prettier" overall. Shader performance is tied almost entirely to GPU processing power and architecture. On a higher-end GPU, this setting is pretty safe to turn up since there's likely power to spare, but when you're on the mid-end or lower, you may need to turn this a ways down.

Lighting

This setting will affect the general quality of lighting within the game, sometimes altering the color of light as well as how crisp it is. Lighting is often highly shader-dependent and as such will fall in line with the shaders setting itself, though architecture can have a lot to do with this. Older GPUs are going to struggle a lot more with effects like HDR (High Dynamic Range) lighting and bloom, while newer GPUs tend to be better optimized for these effects.

Anti-Aliasing

Anti-aliasing is a process where the GPU smoothes out jagged edges in the image, such as the barrel of the gun, character models, and so on. It's not supremely essential and many games don't even let you enable it, but it can improve image quality considerably depending on if the game is edge-heavy (F.E.A.R., I'm looking at you).

Unfortunately, next to resolution, anti-aliasing is the ultimate resource hog. Anti-aliasing demands good memory bandwidth, and at higher resolutions requires a great deal of memory as well. We've noticed that a resolution of about 1920x1200 is where modern GPUs can tend to run out of video memory, especially if they only have 512MB on-card memory or lower. These cards may run perfectly fine before anti-aliasing is enabled, but the performance impact if it's enabled can be devastating.

Anti-aliasing is also one of those points where architecture makes its appearance, particularly in ATI's Radeons. Simply put, the 4000 series performs substantially better when anti-aliasing is enabled than do previous generations. ATI has never confirmed that anti-aliasing was "broken" in the hardware of the 2000 and 3000 series, but generally speaking they produced much more precipitous performance drops even in the flagship 3000-gen GPUs when anti-aliasing was enabled. The 4000 series fixes the problem and brings anti-aliasing performance more or less in line with the GeForces on the market.

Texture Filtering

Texture filtering is my bread and butter, and I'll generally preserve this setting at the expense of almost all others.

Games will use different texture qualities depending on the distance from the "camera" in order to improve performance, in a technique called mip-mapping. The textures closest to you will look best, while those farther away will have their detail sometimes dramatically reduced. With filtering disabled, you'll often see the mip-mapping in effect, where there'll be a hard line in front of you that moves with you. The same texture will be clearer near you, and suddenly drop in quality past that line.

There are three basic texture-filter settings: Bilinear, trilinear, and anisotropic. Anisotropic filtering generally has settings from x2, x4, x8, and x16. These settings "move" the texture drop-off line in some cases, but also blur the border, allowing for smooth transitions between each level of detail on the texture so you don't see that hard line. Indeed, anisotropic filtering in particular will radically improve the detail of the texture on the ground in the distance, which keeps the look of the game consistent.

Mercifully, modern GPUs have optimized the texture filtering process extremely well, and it's typically safe to enable regardless of hardware class. You can always turn it down to see if there's an improvement in performance, and I've found in some cases that a setting of x8 anisotropic filtering will provide an adequate trade-off between performance and picture quality.

V-Sync

Last but not least, there's V-Sync, the setting that many gamers leave turned off but I, personally, cannot do without. V-Sync is short for Vertical Synchronization, and it synchronizes the frames rendered by the video card with the frame rate of your monitor (59 or 60 frames per second for the overwhelming majority of LCD screens). Left disabled, the game can perform much faster, but something called "tearing" can also occur, where a new frame starts getting drawn before the old one is finished, and a distinct line appears in the image where this occurs. A lot of modern games are pretty good about minimizing tearing, but nonetheless it exists.

V-Sync gets rid of tearing entirely, but introduces a couple of wrinkles of its own. It locks the frame rate to 60, and divides it in half if the graphics hardware can't keep up, plunging from 60 to 30, or even 15 or worse, which is essentially unplayable. This can be averted by enabling an option called Triple Buffering, but nonetheless, V-Sync incurs a considerable performance penalty not limited to any single hardware factor.

Another downside of V-Sync is that it can introduce sometimes noticeable latency, or "input lag," between the commands you issue and the game itself. This can cause a game to feel somewhat sluggish.

So with these horrendous downsides, why enable it at all? For me, it's because tearing is very distracting, and my games perform plenty fast enough with it enabled anyhow. Remember, this isn't about how fast you can get the game to run, but about what's comfortable for you and what trade-offs you're willing to make.

CPU

One last note: Your CPU impacts graphics performance, too. If your processor is on the slower end, it will limit how much work is fed to your graphics hardware. Some games run fine with a slower processor (Crysis, for example), while others can be surprisingly punishing. Those of you with older CPUs will notice that Left 4 Dead slows to a crawl when large numbers of zombies are on-screen, and Far Cry 2 seems to be heavily processor-reliant in general. If changing the software settings one way or the other doesn't have an appreciable effect on performance, odds are your processor is holding things up.

CONCLUSION

Hopefully this guide has given you some idea of what all those settings in your games do. I know how daunting they can seem, but an understanding of how to set them can make your gaming experience much more enjoyable overall. Games, for me at least, do hinge somewhat on the graphics. A game with excellent graphics can feel very immersive while a game with blocky models and blurry textures can remind you that you're just playing a game.

I'm a big fan of first-person shooters, in particular, and I've found they can be very sensitive to video performance. For me, a high frame rate when playing these definitely improves my performance and makes it much easier to make more precise shots. It doesn't necessarily make up for my being a miserable shot to begin with, but it helps. For you, it could be all the difference in the world.